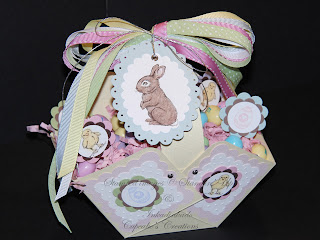
Easter Baskets Tutorial and Video!
Hi Everyone! Well, here is my second attempt at a scrappin' & stampin' video! I hope you find it helpful and useful! Thanks for lookin'! Be Sweet! Until next time...
1. Cut a piece of 80lb or stronger cardstock in a 8.25" square. Using the trimmed off piece, cut an 8.5" x 1.5" strip for the handle. Set aside.
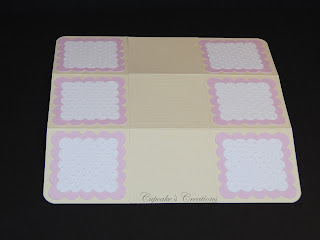
2. Score at 2.75" from each side. Turn and Repeat. (Round corners at this point if desired!)
 3. Using the Cricut Celebrations cartridge (p. 122), select Blackout, Real Dial Size and Scalloped Square buttons. Select, Quanity 6. Using roller dial on
right side of machine, dial 2.5". Cut. For 2" scalloped square, repeat above step dialing in 2".
(Emboss 2" scalloped squares at this time if desired)
4. Adhere all 6 sets together.
5. Fold left flap slightly over center flap and right flap slightly over left and center flap. Place handle
approximately 0.5" - 0.75" below top of
center flap edge. Secure handle with two brads. Repeat on other side.
6. Add desired "Sprinkles"! Have fun with it!

Easter Basket #2 Tutorial
1. Cut a piece of cardstock 8.5" square. Using the trimmed off piece, cut an 8.5" x 1.5" strip for the handle. Set aside.
2. Score at 2.5" from each side. Turn and Repeat.
3. Using the Cricut Celebrations cartridge, select Blackout, Real Dial Size, Scalloped Square, Quantity 2. Using the roller dial on the right side
of the machine, dial 4.5" and Cut.
4. Repeat step 3 for second color.
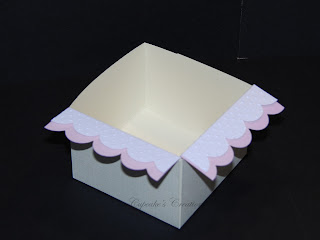
5. Trim 0.5" from one left and one right side off all four 4.5" scalloped squares.
6. After trimming all four scalloped squares, cut in 1/2 (2.25")
7. Score pink layers 1.0" from scalloped edge. Repeat for all four pieces of scalloped edging.
8. Score white layers 0.75" from scalloped edge.
Repeat for all four pieces of scalloped edging.
 (Emboss white layer at this time if desired).
9. Adhere ALL edges to the inside and outside of box.
10. Center handle, adhere on the inside with adhesive. Fasten handle with brad approxi mately 0.5" - 0.75" down from the top of the box.
11. Add Sprinkles and have fun decorating!
Ingredients used:
Paper: Bazzill Chiffon, Petal Soft, SU Old Olive, Soft Sky, Close to Cocoa, Chocolate Chip, Barely Banana, Certainly Celery, Pretty in Pink
Ink: SU Soft Sky, Barely Banana, Certainly Celery, Pretty in Pink, Chocolate Chip
Stamps: SU The Gifts of Spring, Fancy Flexible Phrases, Inkadinkado Bunny


13 Sweet Comments So Far:
Mona, wonderful job on your 2nd video! Very easy to follow, even for me! Will be trying it later this week! I love it!
Hi, I really like your new video. Very polished! Great project that I think I can handle! You are so talented! I'm so glad I found your blog! Thanks!
Thank you both for your support with my blog and videos! I really appreciate all your feedback! Thanks so much!
Great tutorial, Mona! Easy as pie to follow!
Helen, Thanks for looking and for the kind words!
Very professional looking video and quite instructive! Glad I found your blog!
Kelly, Thanks for the kind words! I hope the instructions are helpful!
Excellent professional looking video! Great Job! Thanks -Jen
Great video!
Thanks for looking! I hope you girls made some baskets with treats in for your friends!:) Such a little thing can bring so much happiness to someone and make their day!:) That is why I love doing this stuff even though it can be CHALLENGING!:) Hugs, Mona
Thanks for posting this video... My sister and I are gonna try it this weekend! Have a blessed Easter weekend and stay creative!
These are so cute...I'm working on one right now. Thanks for sharing.
Thank you so much for leaving a sweet comment!