Time To Be Creative...MFT August Teasers Day 2 69

Mona Pendleton | Wednesday, July 31, 2013 @ 9:00 PM | , , , , , ,

Hi there! Welcome to Day 2 MFT August Teasers! The new products will be available on Tuesday, August 6th at 10 PM Eastern in the MFT Boutique. This release, just like ALL of MFT's releases is overflowing with amazing products! Be sure to hop over to the MFT Blog for a list of today's participating designers along with the amazing prize info!

In case you missed my post yesterday (click HERE) I'm very excited to introduce you to my latest stamp sets, coordinating dies as well as 1 of 4 stencil designs that are included in this month's release!

Timeless stamp set:
Die-namics Time Pieces which coordinates flawlessly with Timeless:
the Collage Backgrounds stamp set:
and the Gears Stencil which is an MFT EXCLUSIVE product which means it may only be purchased at the MFT Boutique.
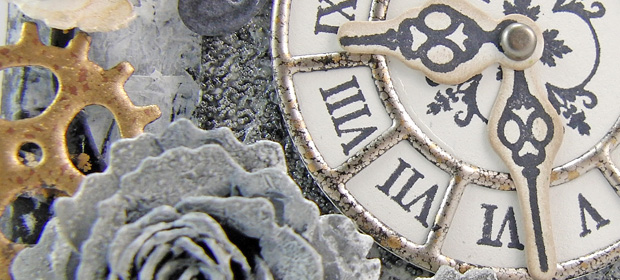
I altered a wooden box using using the Gears stencil, the Timeless and Collage Backgrounds stamp sets as well as die cuts made using Die-namics Time Pieces. Once I painted, collaged and stenciled the gear design on the box, I was ready to embellish.
I stamped two of the four clock faces from Timeless then gave each one a metallic frame overlay:
I adorned with gears and cogs made using Die-namics Time Pieces as well as a cluster of various sized roses then added color using some sprays including MFT MIX-ables Steel Shimmer Mist:
I finished it off with a beautiful butterfly from Inspired By Butterflies sporting a die cut gear and rose:
Here's a view of the top:
If you would like to see a full 360 view of this project please watch the video below:

I also made a greeting card featuring one of the four clocks from Timeless along with a sentiment from Sending Thanks which by the way is FREE with $60 purchase ~ you can read all about it HERE.
To create this card, I first used the Gears stencil along with white acrylic paint to stencil the background layer then I layered a piece of Kraft cs that was stamped using the number and letter collage image from Collage Backgrounds, followed with a stamped / die cut clock from Timeless. To complete the card, I adhered several die cut gears and cogs that were made using Die-namics Time Pieces:
Here are a few steps that I took along the way when creating my altered 3D clock project. I started with a wooden box that I purchased at a local craft store. I first painted a coat of Gesso and gray acrylic paint on the box.
I randomly stamped a few of the images from Collage Backgrounds on tissue paper using permanent ink.
I tore the tissue paper apart being careful to keep the stamped images intact then I randomly adhered them to the box.
Once dry, I randomly applied design and texture using the Gears stencil and fiber paste. 
Thanks so much for visiting ~ I hope you enjoyed my projects!
Be sure to stop by the MFT Blog to see what the rest of the team has created. You'll also read about some HUGE prizes being given away this week during Teaser Time that you won't want to miss! I'll be back tomorrow with more to share for Day 3. Hope to see you then!
Be Sweet :)
post signature


Read More

Happy Times...MFT August Teasers Day 1 72

Mona Pendleton | Tuesday, July 30, 2013 @ 9:00 PM | , , , , ,

Hi there! Welcome to Day 1 MFT August Teasers! The new products will be available on Tuesday, August 6th at 10 PM Eastern in the MFT Boutique. This release, just like ALL of MFT's releases is overflowing with fabulous products! Be sure to hop over to the MFT Blog for a list of today's participating designers along with the amazing prize info!

Today I'm very excited to introduce you to my latest stamp set, coordinating dies as well as 2 of 4 stencil designs that are included in this month's release!

Timeless stamp set:
Die-namics Time Pieces which coordinates flawlessly with Timeless:
the Collage Backgrounds stamp set:
the Brick Wall Stencil:
 and the Gears Stencil which is an MFT EXCLUSIVE product:
I scrapped a few photos of our vacation to China in a canvas album which I altered using lots of stencils, gel medium and sprays. To begin this project, I added lots of design randomly using both the Brick Wall and Gear Stencils along with gel medium. Once dry, I sprayed with various colored inks and sprays.
I've also included the beautiful sunflower from LJD Splendid Sunflower which I heat embossed in gold along with a variety of other homemade blossoms and die cut embossed gears made using Die-namics Time Pieces. 
I stamped one of the designs from Timeless on the pretty die cut scalloped border from Die-namics Blueprints 6
The cover features a sentiment from Timeless as well:
I stamped the gears image from the MPD Collage Backgrounds stamp set on a die cut tag from Die-namics Blueprints 6:
Although the entire book including both the front and back covers, inside and out, as well as all the pages feature the brick wall and gear stenciled designs, they are all very different than the next by design :) 
Page 1 features a sentiment from LLD Enjoy the Journey along with another fancy clock from Timeless along with lots of die cut gears and cogs from Die-namics Time Pieces:
Layered behind the clock are a few die cut tags made using Die-namics Blueprints 6 that were stamped using two of the three images from Collage Backgrounds:

Page 2 features another pretty clock from Timeless along with a golden sunflower from LJD Splendid Sunflower:
Up close you can see the design detail on the clock face as well as the beautifully detailed golden embossed sunflower:
Page 3 features another beautiful clock image from Timeless 
This clock is quite decorative all in itself:
Lots of die cut gears, cogs, blossoms and buttons:
Another fun sentiment / word from LLD Enjoy the Journey which is packed with so many fun and versatile sentiments / words.
More die cut / stamped tags made using the tag die from Die-namics Blueprints 6 and images from Collage Backgrounds:
Last but not least is page 4 which features the fourth pretty clock image from Timeless along with a golden enamel embossed overlay as well as a stamped scalloped border above the photo:
I surrounded the clock with lots of blossoms and die cut gears and cogs:
Thanks so much for visiting today ~ I hope you enjoyed my album!
Be sure to stop by the MFT Blog to see what the rest of the team has created. You'll also read about some HUGE prizes being given away this week during Teaser Time that you won't want to miss!

I'll be back tomorrow with more to share for Day 2!

Be Sweet ;)
post signature


Read More

bloom & grow... 46

Mona Pendleton | Sunday, July 28, 2013 @ 9:01 PM | , , ,

Hi there! I hope you had a great weekend! It's Monday so it's time for a new Simon Says Stamp Monday Challenge on the Simon Says Monday Challenge blog! From the long days of summer to a beautiful sunset, butter to golden yellow hues, this week's challenge is an ode to sunshine. Design team member Anna-Karin requested a challenge that embraces the summer season and all thing sunshine!

Summertime makes me think of beautiful flowers and all the water it takes to keep the foliage thriving and surviving here in the Arizona desert. With that thought in mind, I altered a watering can: 

To create this project, using the Riveted Metal Texture Fade embossing folder I embossed Metal Foil Tape Sheets then adhered them to the watering can:


Once I had the can covered, I randomly sponged on black soot Distress Ink and painted the handle using Silver Metallic acrylic paint. I decorated the can with a variety of patterned paper die cut flowers including roses and bitty blossoms.
The background detail on the tag was stamped using an image from Urban Tapestry and features a die cut mini butterfly that was stamped using die cut mini butterfly that was stamped using shabby french script.
Products: Ranger Metal Foil Tape Sheets, Tim Holtz Sizzix & Riveted Metal Texture FadeTim Holtz black soot Ranger Distress InkRanger Adirondack Paint Dabber SILVER Metallic Acrylic Webster's Pages Park DriveSpellbinders Rose CreationsSpellbinders bitty blossomsTim Holtz Urban TapestryTim Holtz Sizzix Die MINI BUTTERFLIES, Tim Holtz shabby french, Artistic Outpost Bloom & Grow, Tim Holtz Idea-ology Crinkle Ribbon,  Tim Holtz Distress Ink Bundled Sage StainTim Holtz Core'dinations DISTRESS Colorcore,   May Arts Ivory Twine
Come join in and show us your green for a chance to win a gift certificate from the ever generous Simon Says Stamp.


Thanks for visiting!
Be Sweet ;)
post signature
Read More

special Blessing...AMMCC 4 46

Mona Pendleton | Thursday, July 25, 2013 @ 8:55 PM | , , , , , ,

Hi there! It's been a crazy week for me. We have been in San Diego Monday - Thursday evening with Connor and Meredith touring colleges around So Cal. Early tomorrow (Friday) morning, Scott and I will be catching a flight to San Francisco to visit Jerry and April for the weekend :) I'm so excited! I can't even begin to tell you how much I miss our weekly lunch / dinner dates. We may need a vacation from our vacation!

It's time for an all new Mixed Media Color Challenge. Thanks so much to all who joined along with challenge #3 ~ there were so many beautiful projects in the gallery! For nearly the next two weeks, we will be playing with the following color combination: red, brown and neutral:
For this challenge, I altered a wooden heart that I bought long time ago from a local craft store in the clearance aisle. It cost $2 and I couldn't resist buying it because I knew I wanted to alter it at some point so here it is. I painted it with brown acrylic paint followed with a coat of crackle medium. 
I added a label made using a Die-namics Designer Labels 4 STAX die with a sentiment from LJD Cheerful Blessings stamped on it. and a little banner made using Die-namics Jumbo Banner Day STAX
I tucked a lace and a Kraft cs bunting made using Die-namics Jumbo Banner Day STAX with polka dots stamped from Distressed Background Blocks under a cluster of paper flowers. I finished it with a resin cherub.
Thanks so much for taking the time to visit ~ I hope I have inspired you to mix things up! Please hop on over to A Mixed Media Color Challenge for COMPLETE details on how to join in the fun and for some awesome inspiration from Sue!
Be Sweet ;)
post signature


Read More

Live Love Grow 29

Mona Pendleton | Wednesday, July 24, 2013 @ 7:21 AM | , , ,

Hi there! I hope you are having a great week! Scott, Meredith, Connor and I have been on vacation this week at our home away from home in San Diego. We have been on a college touring mission this trip as Connor is entering his senior year of high school. We have toured three college campuses in two days and this morning we are off to tour one more. 

I have a page in my art journal to share featuring a combination of paints, stamped and stenciled images:

For a little texture, I randomly applied some crackle paste then sprayed over it with sort of colored mist so it would sink in the between the cracks.
I randomly stamped the chicken wire image from MPD Distressed Background Blocks and a scripty text image from LJD Art Expression Text:
I used a variety of stencils including MPD Graduated Diamonds and MPD Graduated Dots. To finish it off, I stamped a sentiment from MFT Inspired by Flowers Set #1
Thanks so much for visiting ~ I hope you have a great day / night!
Be Sweet ;)
post signature

Read More

Christmas in July...MFT July Creative Challenge 37

Mona Pendleton | Monday, July 22, 2013 @ 9:00 PM | , , , ,

Hi there! Welcome to the July MFT Design Team Creative Challenge! Just in case you are not familiar, the MFT Design Team Creative Challenge is a monthly feature, where we are challenged to explore our creative side using a specific theme, product, or technique.

This month, we are celebrating Christmas in July
I have a couple of Christmas greeting cards to share. My first card features the sweet snowman from Pure Innocence Holiday Hugs:
I stamped the cutie on a die cut that was made using a postage stamp STAX die, inked the edges with Kraft ink and added a sentiment along with two Natural buttons.
My next card features the beautiful Vintage Santa image from Inspired by Christmas which was stamped on a piece of Primitive Cream cardstock that was cut using a die from Die-namics Blueprints 5:
I completed the card with a faux bow and ribbon treatment featuring a variety of bits and pieces from the following Die-namics dies: Blueprints 5, 3 and 1. LOVE to mix and match various dies when I can!
 Thanks so much for visiting! Please be sure to check out the MFT Blog for a list of all the designers who have Christmas themed projects to share with you today.
Be Sweet ;)
post signature


Read More


Cupcake's Creations Copyright © 2010 Prozine - Designed by Lasantha customized by Scott Pendleton for Mona
Banner graphic elements courtesy: House of Three
Home | RSS Feed | Comment RSS