
Hi There! Time again for another Creativity Challenge at The Play Date Cafe. Here is the card I made using the colors for the PDCC29: Sarah chose this week's gorgeous color palette:
 I have been having so much fun lately "experimenting" with a variety of techniques that I learned while at the Spellbinders Retreat from the "Senior" DT Leaders (Cathy, Beth & Kim :)
 The heart & button embellishments were created using what I refer to as the "embossing & sanding" technique &the blue background was created using the "airbrushing" technique. I will spare you the details here because if you continue to scroll down, you will find the step-by-step tutorials :)
I hope you can join along with this week's creativity challenge. After you have made your project, please head on over to The Play Date Cafe & link your post. If you post your creations in an on-line gallery, please label it PDCC29 so we won't miss them! Be sure to see what all The Play Date Cafe DT girls have created, (on my side bar) & our Guest Designer, Heidi Van Laar. I hope you are able to join along with this week's challenge.
Supplies Used:
Stamps: Waltzingmouse Sweethearts, Judi Kins Artists Signature
Paper: Gina K. Pure Luxury cs, Papertrey Ink
Ink: Copic B41 Powder Blue, Memento Tuxedo Black, Ranger Vintage Photo
Other: Spellbinders™ Shapeabilities S4-014 Timeless Heritage, I2-1002 Butterfly Impressabilities™, W-001 The Wizard™, Copic Air brush, Melissa Frances Vintage embellishment, Fiskars border punch, ribbon, lace, button & brad from stash
First up is Tutorial #1: Copic Airbrushing technique (used to create the background paper on this card):

Supplies Used:
Spellbinders™ Butterfly Impressabilities™
Spellbinders™ The Wizard™
Copic Airbrush
Copic Marker (I used B41 Powder Blue)
Gina K. Pure Luxury cs
Step 1:

If using The Wizard™, assemble your sandwhich like so: White Master mat, tan emboss pad, cs, Impressabilities™, White Master mat. **Note: "sandwhich" may vary according to die cutting system used. **Tip: On a corner, I gently tape paper to Impressabilities™ template so when removing to spray, paper will remain attached to template.
Once sandwhich is formed, run cs through machine. Keeping paper & template together once embossed.
Step 2: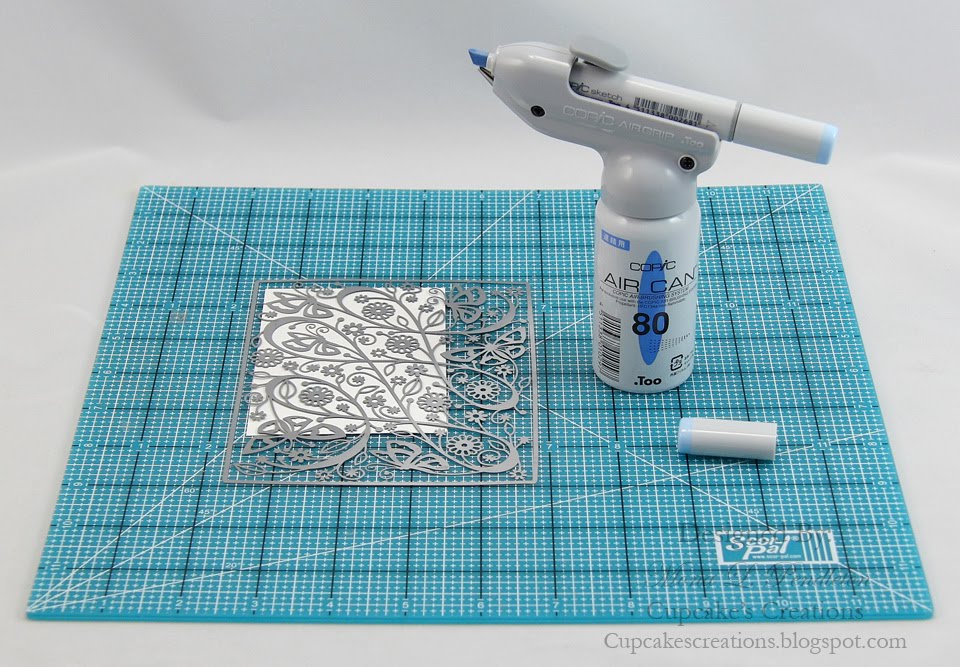
Now you are ready to airbrush background any color you like! Simply place marker in Copic airbrush according to manufacturer's directions.

With a gently sweeping motion from left to right, spray right over the template until you have the shade desired.
***Try mixing it up a bit & use several different colors on the same embossed piece of cs! The possibilities are endless! :) Hope this helps & maybe you will give it a try!
Tutorial #2: Embossing & Sanding Metal like products:

Shapeabilities™ Timeless Heritage die templates
Royal & Langnickel Brush Blank Boards
ultra fine sanding block
Steps 1 & 2:

If using The Wizard™, assemble your sandwhich like so: White Master mat, die template with product left in place, tan emboss pad, white master mat. **Note: "sandwhich" may vary according to die cutting system used.
Step 3:

Remove cut & embossed product from die template. Using an ultra fine sanding tool, gently rub over the shape, revealing the metal underneath until desired look is achieved.
& Embossing & Sanding Metal
Supplies Used:

Spellbinders™ The Wizard™
Spellbinders™ Premium Craft Foil
Spellbinders™ Butterfly Impressabilities™
ultra fine sanding block
Step 1:

If using The Wizard™, assemble your sandwhich like so: White Master mat, tan emboss pad, Spellbinders™ Premium Craft F oil, Impressabilities™, White Master mat. **Note: "sandwhich" may vary according to die cutting system used.
Once sandwhich is formed, run through machine then carefully remove separate foil & template.
Step 2:

Using an ultra fine sanding block, gently sand over the shape, revealing the metal underneath until desired look is achieved.
I hope these tutorials provide inspiration for your creating adventures & perhaps you too will give them a try! I would love to see what you make using any of these techniques! Please feel free to email me the link to your project or email a photo :) Feedback is always appreciated :0
Thanks for looking! Be Sweet!


53 Sweet Comments So Far:
Great tutorials, Mona! :) Your card is beautiful! Love the handmade embellishments!
Really fabulous technique and so glad to have you share it with us!
Beautiful card, too...it's doubly featured this week (pop in and take a look through The Open Window : )
Thanks for sharing new technique! And beautiful card here, love that soft tones and refreshing at the same time!
Wow! Very cool techniques and a beautiful card.
so pretty Mona, I really like the lock on the card. Enjoyed for turoials.....
Wow, this is an awesome tutorial! Thanks so much for sharing your amazing techniques! This card is another masterpiece (I hate to keep repeating everybody, but it is!!!).
Soft and delicate beauty You`ve made:)
great tute Mona; I've been eyeing up that butterfly impressthingamibob for a while - it looks fabulous used as a stencil, so soft and pretty
gorgeous, gorgeous card, love how you've interpreted this week's colours :)
Hi Mona! I've been enjoying your blog for a few months now (always great stuff!), but haven't commented until today. Thank you so much for the info on the engraving art blank boards. I had no idea such a product existed, and I'm stoked to get some and play with it - thanks again!
WOW Girl this is GORGEOUS!!!! Love the colours, love the design and love all the technique!!!! Such an amazing card!!!
ps. Love the new look blog too!!! :)
Gorgeous! So soft and very elegant! Love the techniques. I thought you had sponged the background. But even softer and more pretty using the airbrush and LOVE the embossing with the metallic materials!
Beautiful card Mona. I loved the tutorials too. You make it so easy to follow along, thanks a million! ~Diane
Gorgeous card, Mona! Love the airbrushed, embossed background and those embellishments are just amazing!! Thanks for sharing your techniques.. your tutorials are wonderful!!
WOW! Great tutorial Mona and your card is Beautiful! :)
Thank you for taking the time to do a tutorial, love the pretty card you created:-)
This turned out beautifully! Love all the techniques you shared. I look forward to participating in this week challenge with you. :)
Wow I love this card! Thanks so much for the very informative tutorial! This turned out fabulous!
MONA.... your talent takes my breath away.. this card is LOVELY! I LOVE your tutorials too.. I would never EVER have guessed you made that cute charm... now I gotta get the supplies.. and your making me want to fire up my copic air brushing too!!! (I am not so good.. I need work! HA!)
Have a GREAT day.. THANKS for sharing your BEAUTIFUL work with us!
So pretty! Love all the embossing, the metal embossed embellishments you added are wonderful! Thanks for the tutorials.
Mona this project is so spectacular! Making your own embellishments is so neat! I love that metal embossing technique and I love that stenciled Copic technique too! Thank you so much for this amazing tutorial! You are really sweet to do this!
Beautiful card and great tutorial! This is so gorgeous and you make it look so easy! I hope it is!!! Again your card is a masterpiece!
Thank you so much for this great tutorial! I'm definitely going to give this a try! Love those dies!
Wow that Timeless heritage Die set makes for some incredible embellishments! Thank you so much for this wonderful tutorial! Your card is magnificent! I love it so much!
Gorgeous card - thanks for the tutorials!
Mona, this card is absolutely fantastic! It's so elegant and I love your lace flower with beautiful handmade "hardware"! This is the pinnacle of creativity! You are so kind to include a step-by-step tutorial as well! God bless!
Mona.....you clever girl you :)!!! I learned something today...wahooo!!! The tutorials are awesome and your card is simply gorgeous!!! I really like the airbrushing and the fab charm!!! Hugs ~S~
Hi Mona !!! this card is GORGEOUS. Thanks so much for the tutorials they're great. Now I really want those Timeless Heritage die templates :D
Thank you so very much for this marvelous tutorial! You are so kind to share your "secrets" with us! Your results are always incredible! This card is pure bliss! I love how you made that lace flower and those metal embossed charms! You are amazing!
Oh my goodness, this is just plain LOVELY! The subtle blue background is so neat and LOVE the accents. Thanks for showing the steps.
Your card is just too beautiful for mere words! Thanks for showing us how it's done!
Thanks for the visuals--you have so many techniques and tools that I would love to use! WOW--great stuff! Love this card--super pretty:)
This is just absolutely fantastic. What a tutorial. BTW, congrats Mona, you won the Cutting Cafeway giveaway. Please email me.
Hugs
Carole
Oh my! This is another jaw droppingly beautiful creation! I love those charms that you made and that stencil technique is gorgeous! Thank you so much for this wonderful tutorial too! They are always such a hit!
Mona, your card is so magnificent; I can't find the words to truly describe it! That lace flower is so pretty as is all the lovely embossing and the charms that you created. I love that you have included a very helpful tutorial for all of us challenged girls to try! You are so sweet to do this! Thanks!
Amazing tutorial!! You created the background? OMG.... It is gorgeous. This is something I need to try! I love the way you used the colors from the inspiration. Love the end result!!!
Thanks for sharing your talent, your time, and most of all your tips and techniques...You are an amazing person!!!
Thanks for the wonderful tutorial Mona! I will definitely be wanting to give this a try! Your heart locket and button are gorgeous! Oh yeah! the card is fab too! DA! ;0)
Mona, thank you so much for this very detailed tutorial! Your card is so beautiful and I can't wait to give this a try!
Fabulous card and technique! You are such a creative little cupcake! Love those gorgeous charms you made! Thanks for a great tutorial!
Fabulous tutorial! Thank you so much! I hope I can handle this; you make it look so easy! Gorgeous card!
Mona, I'm fascinated by your tutorial! I really want to give this a try. I'll be getting those beautiful dies from Spellbinders first! You have officially inspired me!
Mona, I love both the stenciling and the embossing techniques! Your results are gorgeous! Wow, this card is amazing! Your tutorial is amazing! Thanks for sharing your wisdom!
Mona, your card is just magnificent! What a sensational lace flower and I love all the gorgeous embossed metal treatments! It is so nice that you take the time to share these awesome tutorials with us! This really makes me want to buy these dies and give it a try!
Gorgeous elegant vintage masterpiece, Mona! I love that blue stenciled embossed background; it's so soft and pleasing! The metal charms are just perfect! Great tutorial! You should do more, you are a great teacher!
Mona, your card looks amazing! I LOVE it!
Great tutorial as well.
Hugs and smiles
OMG, Mona, this is another (of many) phenomenal gorgeous creations! I love that blue stenciled background and your sweet lacey flower!. I can't believe you can make those lovely charms! Thanks a lot for showing us how! You are awesome, GF!
Amazing tutorial! Thanks!
Gorgeous card, Mona! You have really got my creativity going! I really want to give these techniques a go! Thank you so much for your very clear tutorial! I think, even I can handle this! LOL!
Mona, I absolutely love how you made this card!!! Really creative and unique! I love the embossed metal! Thanks for a great tutorial! You rock!
Hi Mona--Just love that blue and white. So sweet. Like the touch of green on the endes. The flower is perfect. Your new technique is beautiful, and all your fellow crafters will be doing it. Wonderful job. Sue M.
A fabulous tutorial and a beautiful creation! Absolutely gorgeous!
Mona, you did a great job with this lovely card and your tutorial is so perfect! Thank you so much for all the good tips!
Thanks for sharing those embellishments are so beautiful!!!!! finally I made it this time for the challenge is good to know you are not playing .. hahaaa...
Wow, I love how you made these charms; your tutorial is so easy to follow! Thanks for that and the stencil technique! Your card is gorgeouss!
Thank you so much for leaving a sweet comment!